James Miller G3RUH
Let me stress once again, you need absolutely no knowledge about S-band to get going, anymore than you need knowledge about 2 metres to get onto mode-B. Just accept my word that S-band is easier by far. I started this project with absolutely no understanding of S-band, designed and built it all in an afternoon's pleasant metal bashing.
Take a look at your 2 metre antenna. It's just a load of mechanical bits and pieces juxtaposed to behave electrically in a special way. So too is an S-band dish antenna.
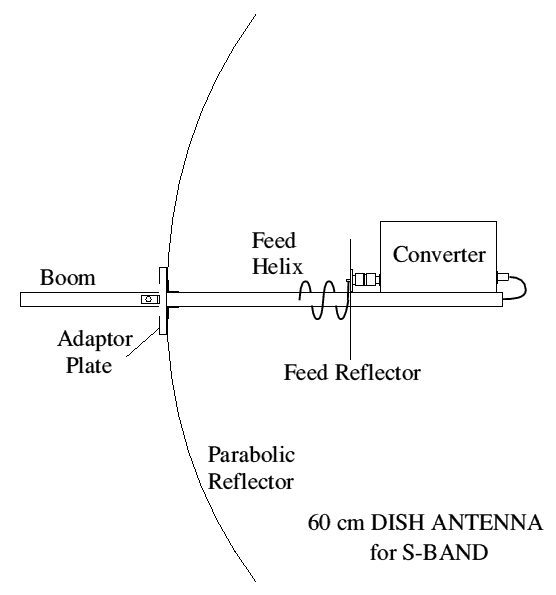
There are as many ways to do this as there are constructors. I'll tell you my way. You don't have slavishly to replicate every nuance of the design. No dimension is critical except for a small bit of the feed system. No exotic tools or test equipment are needed. You have all you need already; hands, hacksaw, file, ruler. Throw it together, and it will work. I know; I did it. At the end of your toils you will have a 60 cm diameter S-band dish antenna with a gain of about 20 dBi RHCP, a 3dB beamwidth of 18° and, with the suggested converter, more than adequate performance to experiment on AO-13 mode-S.
The dish measured 585 mm diameter, and 110�mm deep, which translates into an f/d ratio of 585/110/16 = 0.33, and thus a focal length of 0.33 x 585 = 194 mm. An f/d of 0.33 is rather too concave for a simple feed to illuminate ideally, but at $4/dish who cares? It works, and final antenna is much more compact than the usual shallow dish of f/d=0.6
The dish has a 40 mm hole in the middle with three 4 mm convenient holes around it on a 1�inch radius circle, presumably a standard for lighting attachments. So absolutely no modifications were needed to the parabolic reflector.
Thus there are four more 3.3 mm holes around the centre of the support disc, and two 3.3 mm holes in the boom. Obviously two angle brackets face forwards, and two face rearwards, otherwise the through-boom screws will foul each other.
So there has to be some receive electronics at the feed, such as a receive pre-amplifier or a converter, 2.4 GHz to 144 MHz for example. This puts the low noise receiver and its gain right at the masthead, and the downlead can be inexpensive lightweight RG58/u coax.
I used a model UEK-13-P3C from SSB Electronic. Note the suffix -P3C. This denotes 2400-2402 MHz, as distinct from the 2304 MHz version. [This has now been superceded by the model UEK-2000SAT ].
There are also converters available from Down East Microwave, and a number of specialist designers "advertise" regularly in magazines like VHF Communications and Dubus. See also VHF/UHF/Microwave handbooks (ARRL and RSGB) and the UHF Compendium from Germany.
An S-band helix has a radius of approximately 21.25 mm so, if fed at its periphery, the connector would be 21.25 mm from boom axis, or about (21.25- 6.25) = 15 mm from the boom edge. This time Murphy was on my side. It just so happens that the corresponding connector on the converter is 15 mm from its edge too. So if the converter is clamped directly to the boom, the two connectors line up perfectly. Since an N-type connector has the mating strength of two elephants, it can also support the entire feed assembly! Thus the helix, connector and converter form one sub-assembly which is then clamped to the boom with two large cable wraps. This arrangement also allows it to be slid up and down to peak up the receive signal.
Of course if you use some other converter, the reflector assembly can simply be fixed with two angle brackets in a similar way to the dish attachment.
There is a 13 mm square hole in the middle once more, and the N-type panel connector is affixed approximately 21.25 mm from the middle as described above. Get the exact dimension needed by carefully measuring the the converter. The N-type panel connector is actually mounted on a 1.6 mm thick spacer so that the back of the connector is flush on the helix side. Drill and fix with three screws only, as the fourth will foul the start of the helix.
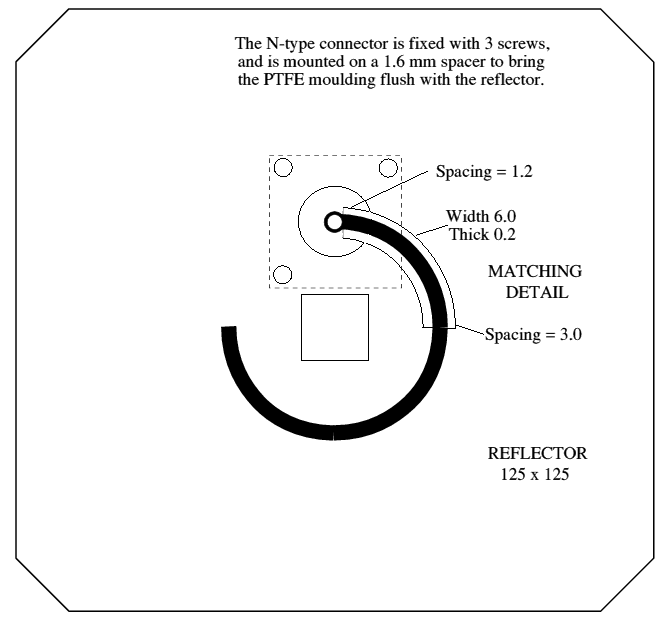
Now carefully stretch the helix to a turn spacing of 28 mm ( +/-1 mm). Make sure it is nice and even.
Cut off and discard the first 1/2 turn. Now, with careful use of pliers bend the first 1/4 turn about 10° so that it is almost parallel to the reflector again. This will form part of the matching section.
Next you need a very thin brass strip, about 0.2 mm thick, 6 mm wide, shaped to follow the curve of the 1/4 turn you just bent. It will go flat between that turn and the reflector. Use the 1/4 turn as a template onto a piece of paper.
Since the copper is 3.3 mm wide, and the strip needs to be 6 mm wide, a line 1.4 mm away can be drawn both sides of the copper with a fat pencil. Judicious use of clamps, weights, blu-tack and adhesive tape will provide the six hands needed to do this! Spend plenty of time to get this drawing just right. Then sellotape the paper to the brass, and with great care use a pair of very sharp scissors to cut out the shim you have sketched.
With more fiddling as above, trap the shim between copper and a flat heat- proof surface, and with a 60 watt iron and large tip, solder the shim to the copper all the way along its length. If you make a mess, dismantle, wipe clean and start again.
You should now have a helix which has a brass shim soldered to its first 1/4 turn essentially flat to the reflector. Cut off the surplus turn(s) from the helix so that you have a total of 2 1/4 turns including the matching section.
Finally solder the helix to the pip of the N-type. The spacing of the matching section should be 1.2 mm at the start by the N-type, and 3.0 mm at the end. Use scrap bits of metal sheet to jig this up, carefully bending here and there to get the whole edifice just so, match spaced properly, helix axis perpendicular to the reflector. This also needs six hands.
Finally apply a very generous blob of solder to the end of the helix and N-type. This will be the only fastening for the helix. It may have a propensity to twist. Sealant will cure this later.
Don't get too paranoid about precision. I guessed the prototype's matching, and it worked great. Then I took it to a friend's 3 GHz network analyser. It showed a lousy match. So I designed the new perfect one as above. On-air performance was unchanged!
Slip the assembly over the boom, and slide it to the correct position. The middle of the helix should be at the dish geometric focus, 194 mm from the parabola on my own model.
Attach a BNC connector to a suitable length of RG174/u coax, and pass it down through the boom, together with the +12v wire, to emerge at the rear and link up with your system. The coax outer provides a return, so only one power wire is needed.
What? You don't have any of these? Wrong! The Sun is your signal generator, the 144 MHz SSB radio is your detector, and an ordinary moving coil AC meter is the power meter.
Indoors, connect everything together and switch on. If you now switch off and on power to the converter, you should hear a substantial change in noise output from the radio in SSB mode. The converter is "converting" something at least, so the wiring is probably sound.
Now set up shop outdoors. Choose a location clear of obstructions. BEAR IN MIND THE POTENTIAL DANGER OF USING MAINS POWERED EQUIPMENT IN DAMP CONDITIONS.
Power up the system once more. Holding the boom by the rear and above your head, point the antenna towards the zenith, that is straight up. This will be the quiet sky. Listen to the noise level and make a mental note of the volume. Headphones are useful here. Now point the antenna at the ground. The noise should increase substantially, approximately doubling in loudness (+3 dB).
Now point the dish at the Sun. If it is shining, this is easy. If it is obscured by cloud, you will have to use your skill and judgment. Either way, the noise level should rise by about 1 dB compared with the quiet sky. This is only very slight, and is why a meter is helpful. Note: if the Sun is less than 10 degrees above the horizon, your antenna will "hear" the gound and this will swamp the Sun noise.
Connect the moving coil AC voltmeter to the loudspeaker terminals. Set the voltmeter onto its most sensitive range, probably 3 volts full scale, and adjust the volume control to about half travel. Note the reading on the meter. Now aim at the Sun, and the voltage reading should increase by about 10%.
This method of measuring noise power is quite accurate provided two conditions are met. First, the audio amplifier must not be limiting through overdriving. You can hear this as a bad crackling noise, or look on a scope. Secondly, the receiver AGC must not be operating. If the S- meter is showing a deflection, the AGC almost certainly is in action, and the AC output voltage will not be proportional to signal strength. You will need an attenuator to reduce the 144 MHz signal. A couple of junk box resistors will do. 1/4 of the signal voltage (-12 dB) is sure to suffice.
Finally wait for an Oscar-13 mode-S session. Just listen around 2400.720 MHz. That will be 144.720 MHz on your 2 metre SSB radio. (Note 144, not 145 MHz). The conversion accuracy won't be very precise, and even with doppler compensation may well be 30 kHz off nominal. If the mode-B transponder is ON too, you will hear many interfering LSB signals corresponding to mode-B's 145.880�- 145.920�MHz.
If the B transponder is OFF, you will hear genuine mode-S stations on USB loud and clear.
There is no such thing as a poor mode-S signal. Anyone who can get a decent mode-B uplink can overload mode-S with ease! The beacon, 70 kHz lower in frequency, is not on at the same time as the transponder. It will be very strong, and decode perfectly at all times.
The system you have built has a Gain of about x100 (20 dB), and a receive noise Temperature of about 200 K. Thus the G/T ratio of your dish is roughly 100/200 = 0.5. And this is the minimum requirement for AO-13 mode-S.
So if someone else is boasting say a 7 metre diameter dish (Gain x13600) and an ultra-low noise preamplifier with an overall receive noise temperature of 100K, then their G/T ratio is 13600/100 = 136. This is 24 dB better than our little dish, so AO-13 signals will be louder. But they won't be better, because the transponder noise floor will be louder too. And their antenna beamwidth will be only 1.5°, which is irritatingly small for satellite operation. Most az/el rotators rattle more than that.
So how do you measure G/T? Carefully measure the Sun noise increase as described above. Call the noise power ratio Y = (Vsun/Vzenith)2. Then G/T = (Y-1)/0.64 at 2.4 GHz!
Now the "0.64" factor includes a measure of the noisiness of the Sun, and this fluctuates from time to time by a dB or so [3]. However, I find the test is mostly repeatable, and is a reliable indicator of performance for better or worse if you have tweaked something. So make it a regular part of the station checkout routine.
The UEK-13-P3C is built into a tinplate box with press-fit lids. It is absolutely not weatherproof or rustproof. The easiest way to keep the rain out is to use a polythene bag. Obtain a clear tough freezer food bag, and pull it over the converter assembly, stretching it around the reflector periphery to make a tight fit. This works well, but is not too robust. There are variations on this theme which will suggest themselves as you contemplate the problem.
A more subtle idea is to keep the antenna indoors. It works through a window, open or closed, though the noise level is higher due to the proximity of the warm house. Or it can be put outside on a tripod when needed. It is so small that it is highly portable, passing through doorways with ease. With its 3 dB beamwidth of 14°, it can be aimed once only for a mode-S session on AO-13.
S-band will no longer be a mystery, apparently accessible only to a favoured few. You will acquire a painless introduction to microwave operation - without even realising it's microwaves.
2. Krome Ed KA9LNV, Satellite S Band: How to Become QRV on Our Highest Band, The Amsat Journal (USA), November/December 1992.
3. Shuch H.P. N6TX and Wilson P.M. W4HHK, Calibrating the Signal Generator in the Sky, QST November 1992.
Reference Data for Radio Engineers, 6th edition, Section 27-39. Howard Sams 1982, ISBN 0-672-21218-8.
Dixon M.W. (Ed) G3PFR, Microwave Handbook Vol 1, RSGB 1991. ISBN 0-900612-89-4.
The ARRL Antenna Book, 15th Edition, Chapter 18. ISBN 0-87259-206-5.
Feedback on these pages to Webmaster. Feedback on the article should be sent to James Miller
Created: 1995 Jan 15 -- Last modified: 2005 Oct 31